How the Clarinet is Made
An instrument created from human craftsmanship and the bounty of nature
Wood that sinks in water?
Grenadilla is a very hard wood and has a specific gravity of 1.2-1.3. It will sink in water. Because it is so hard, it is cut using the same methods that are used to cut metal.
Although it may look light, just this slab of trunk a few dozen centimeters tall weighs over 30 kg. Grenadilla grows in the African Savannah in countries such as Tanzania and Mozambique, and it requires at least 80 to 100 years for its boughs to grow to a thickness sufficient for making musical instruments.
Imagine a tree in the middle of a grass-covered plain stretching out its boughs under a wide-open sky. About 80% of these trees are used domestically for carved folk art, while the remaining 20% is set aside for use as the raw material for clarinets and oboes.

Cross section of a trunk of the grenadilla tree
Nickel silver-the material for the keys
Nickel silver (an alloy which blends nickel and silver) is used to make the keys. A particular blend of this alloy is carefully selected for its metallic stability so that it will not break when processed. The photographs show the assembly process.
Workplace where clarinets are assembled. The bench is crowded with intricate parts and tools.
Even a 0.1-mm error is unacceptable!
Once the key posts have been attached to the body, the keys are mounted on it. There are approximately 100 key parts.
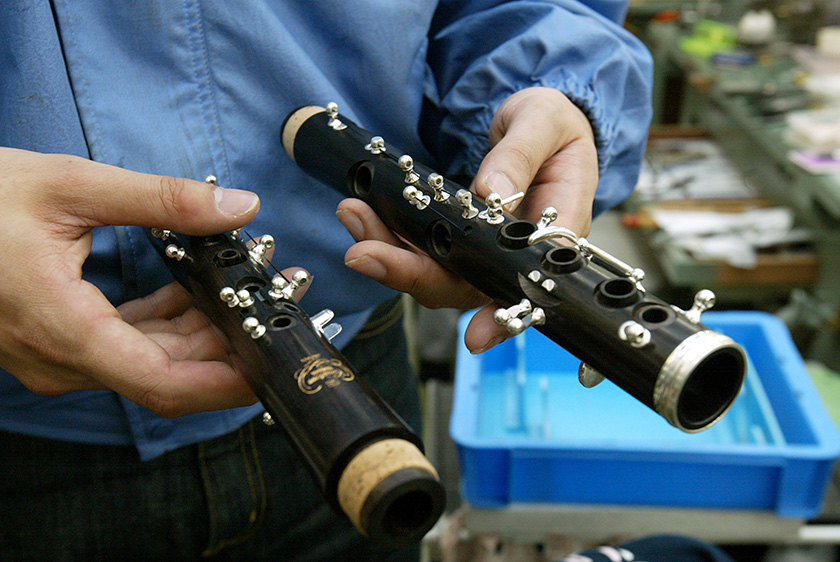
The body with the key posts attached to it. The tip of the body is plugged with cork.
Since there are subtle variations between each key and between each body, it is very tricky to adjust the keys so that they align exactly. Even a gap of as little as 0.1 mm in the join between the key and the body will result in a wobbly key. Each key is individually planed until it fits perfectly.

A key being mounted on the body.
Three hours per instrument
It takes around three hours to assemble a single instrument. It is not only the keys that require fine adjustment to ensure that they are mounted in just the right position on the body-the pads (or caps) must be properly positioned in relation to the body.
Cross-sectional view of pad

All thanks to an insect?
The method for attaching a pad first involves heating a black adhesive over a flame until it melts, and then smearing it on the pad. The pad cup is then heated with the flame, and the pad and pad cup are stuck together. Once the pad and pad cup have been combined into a single component, this is mounted on the body and its position is finely adjusted.
The adhesive is called shellac. It consists of a mixture of turpentine and a thick, light brown liquid extracted from the lac bug.
The lac bug is an insect that inhabits India and Southeast Asia. When it shrouds its body or makes shells for its eggs, it sucks nutrients from the trees and secretes them in the form of a resinous substance. The secretion of the lac bug has traditionally been used as a raw material in furniture paint, and is a harmless, natural substance that is used today in pharmaceutical products and cosmetics.
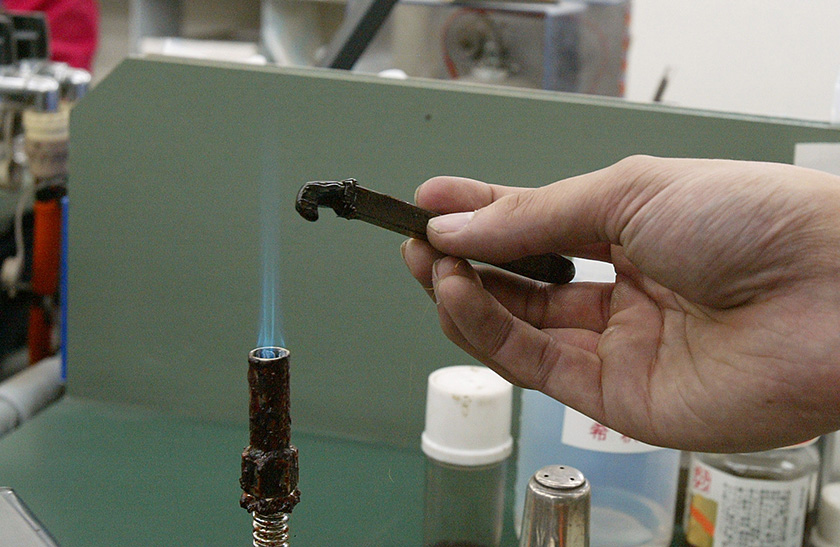
A blue flame on every workbench for heating the adhesive
Watch out for the tip of that toothpick!

Checking that there are no gaps in the pad using paper on the tip of a toothpick
A piece of paper attached to the tip of a toothpick is used to check for gaps in the pad. If the pad is properly fitted, the paper will hang straight down when inserted. However, if the paper slants one way, it will fall out easily in some places.
If the pad is not seated properly, the pressure within the body will change and sound will be emitted. Thus, if there are gaps in the pad that enable the air to escape, sound waves will no longer build up inside the instrument and its tone will be affected.
Musical Instrument Guide:Clarinet Contents
Structure
How the Instrument is Made
Choosing an Instrument
Trivia
- "I Broke My Clarinet" is a French folk song
- Inspiring composers
- In Italy, a single B♭ clarinet
- At one time, most clarinets were made of boxwood
- In vogue in the 1900s-the metal clarinet
- A transparent clarinet?
- Famous clarinet works: concertos
- Famous clarinet works: chamber music
- What is the relationship between hertz and cents?