Care and Maintenance of a Violin
Occasional maintenance
For the best tone, rehair the bow regularly
Of all the inquiries about the repair of stringed instruments, most are inquiries about the bow and of these, 80% are requests to rehair the bow. The violin is played using rosin on the hair to make it cling to the strings, but when rosin dust is absorbed into the hair, the surface of the hair becomes slippery, and the bow will not cling to the strings, no matter what type of rosin is used. Thus, when the bow will no longer cling to the strings, it is time to rehair the bow. As a guideline, beginners should rehair every six months to a year.
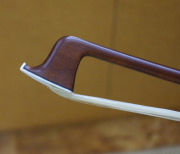
This is the head of the bow. Adhered to the head is a white part called the chip.
Another problem with the hair is that it stretches and shrinks depending on the season. During the dry winter months, the hair shrinks, and no matter how much you loosen the screw, the hair is not loose enough. In contrast, during the summer, the high humidity causes the hair to stretch, and no matter how much you tighten the screw, the hair is not tight enough. Sometime an adjustment is all that is needed, but in many cases rehairing is required. Regular rehairing is advisable for the best tone.
The most important part of the bow is the head. If you look closely, you will notice that each bow head is a different shape and size, giving individual bows their own distinctive character. This chip often becomes cracked. Both bone and plastic are used to make the chip, but the plastic type is easily cracked. To fix a cracked chip, the old chip must be removed and a new chip glued to the head.
In addition, the bow is very delicate and should be stored in the instrument case when not in use, but some people accidentally put it in the wrong way. As shown in the picture, the bow should be inserted with the head secured by the strap. If the bow is put in facing the other direction, the head will rattle around.
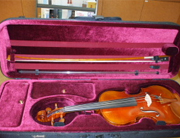
Be careful to secure the head when storing the bow.
If high humidity is a concern
If high humidity is a concern, the violin case can be made dry and cool for safe storage of the instrument. Some cases come with a thermometer and hygrometer built in, but even for those that do not, a hygrometer can be put into the case. For more protection, there are products that can help control humidity, those that remove humidity only, and others that prevent both too much and too little humidity. The most inexpensive of these start at about US $9.00. Products that only remove humidity are used during periods of high humidity, while the dual action type can be used all year round and can normally be left in the case.
Peg compound for making the tuning peg easier to turn
During periods of high humidity, the tuning pegs become hard to turn because of the swelling of the wood. Peg compound is a useful tool at these times and makes it easier to turn the tuning pegs. Keep some peg compound on hand in seasons with lots of rain. Apply the compound only to the parts of the tuning peg that come into contact with the peg box.
What if the bridge is crooked?
Lift the violin up to eye level and look straight across the bridge. The bridge on the tailpiece side should be standing perpendicular from the top plate when looking directly from the side.
However, the tension of the strings constantly pushes the bridge down toward the top plate, and the bridge can easily become crooked. Be careful! This can cause the feet on the bridge to deform, or can even cause the bridge itself to bend. If the bridge becomes crooked when you tune the instrument, the bridge may have deformed, and you should have an expert take a look.
To adjust the bridge yourself, follow the procedure below:
- Look at the violin from the side and check the angle of the bridge.
- If it is not perpendicular, slightly loosen the strings, then carefully move the bridge into place.
When doing this, be sure to stabilize the instrument by laying it on your lap and cradling the corners of the violin with both hands (from your wrist to the base of your little finger). Then, grip the bridge from above with the index fingers and thumbs of both hands, and carefully move the bridge into alignment. - Tune the instrument and check the angle of the bridge again.
Continue until the bridge is perpendicular. If this is the first time for you to do this kind of work, it's a good idea to have someone who has done it before observing you.
If the sound post falls down, can I fix it myself?
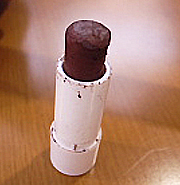
The sound post is only wedged between the top and bottom plates, and sometimes it falls down. It will be obvious when the sound post falls because it will rattle around inside the instrument. When this happens, have a professional fix it rather than trying to fix it yourself. The sound post is installed using a special tool (see photo). Once the sound post is wedged between the plates, it is lightly tapped to move it into the proper position little by little. This is very difficult to do for all but the most seasoned professionals. However, if the sound post is not perfectly straight or its position is off even by a few millimeters, the tone of the instrument will be degraded.
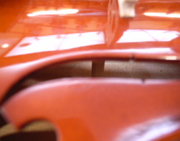
The sound post can be seen through the f-hole
Some people think they would like to try to fix the sound post themselves, but this is unadvisable as attempting to do so may damage the instrument. It is strongly advised that you leave it to a professional.
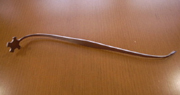
The tool used to install the sound post.
The peg is too loose and cannot be tightened!

When a peg becomes loose, remove it from the peg box and apply some chalk to it.
When the climate is very dry, loose pegs are a common problem. This is because the wood becomes dry and shrinks, causing the pegs to become loose in the peg box. In the worst cases, the peg spins freely inside the peg box. To resolve this problem, completely loosen the pegs and remove the string, then apply chalk to the peg to help create friction. It is not necessary to apply chalk or rosin to the entire peg, only those parts that come into contact with the peg box. Needless to say, when the climate is humid, the wood swells, and the peg is difficult to turn. Thus, if the peg box holes and pegs just happened to be produced in the cold winter months, there will likely be significant problems with these parts come summer. However, there are some cases where it is not just a problem of dryness but rather a problem of age that requires a physical solution. If chalk does not solve the problem, you must consult an expert.
Fitting the rubber parts of the shoulder rest
Replacing the rubber part on the shoulder rest requires a considerable amount of strength. To minimize resistance when fitting the rubber part, first apply a drop of water with your finger or the like to the part of the foot of the shoulder rest that is bent most sharply. Apply a single drop to both the front and rear of the bent portion. Next, insert the rubber part carefully, like you are stroking it. After fitting it, use a cloth to wipe away any remaining water.
Musical Instrument Guide : Violin Contents
Origins
Structure
How to Play
How the Instrument is Made
Choosing an Instrument
Care and Maintenance
Trivia
- The f-hole used to be a C-hole or S-hole
- Why the f-hole?
- Violinists must bow to the horse
- Steel strings or gut strings? That is the question
- Is the chinrest the unsung hero of the violin?
- Most violin varnishes are also medicines
- Violin masterpieces: Solos I
- Violin masterpieces: Solos II
- Violin masterpieces: Solos III
- Violin masterpieces: Concertos I
- Violin masterpieces: Concertos II
- Viola masterpieces: Chamber music
- Viola masterpieces: Concertos
- Cello masterpieces: Concertos I
- Cello masterpieces: Concertos II
- Cello masterpieces: Solos
- Contrabass masterpieces: Concertos
- Contrabass masterpieces: Chamber music
- Orchestral masterpieces featuring the contrabass
- What do you call the part on the bow that you hold?