How to Play the Bassoon
How to make a reed
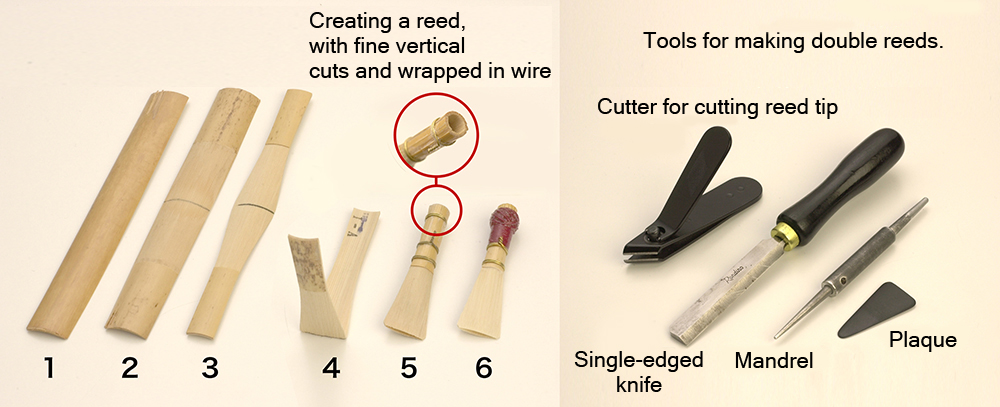
Making a reed by hand
Professional bassoonists mostly use handmade reeds.
For this reason, as an example, it would be good to briefly describe how a reed is made.
- First, split a cane of common reed into four sections of equal length.
- Strip the bark at the center.
- Cut the long edges to produce a boat-like shape.
- Score the reed at the center and fold it into two, and make vertical incisions on the part of the cane where the bark remains.
As the incisions cut along the line of the fibers of the cane, it is easy to tear and destroy the reed at this stage. - Holding the cane around a mandrel.
- Fasten the base with wire to hold it in a cylindrical shape.
Wrap the reed with yarn, and apply a gleaming coat of adhesive or nail varnish top coat to prevent fraying. Cut the tip of the reed, insert a plaque between the two sides to cut against, and shave the surfaces with a knife to finish.
* To get started, try making reeds using "profiled cane," which has already been prepared through to step (3) outlined above.
How to produce a clear sound
Reeds should be moistened with water before use. If the reed is used while it is dry, its condition will change as it becomes moist. It is best to prepare some water before playing, so that it can be applied to moisten the reed if it becomes dry during a performance.
Using sandpaper for adjustments
To adjust the reed, wet sandpaper can be substituted in the place of specialist tools. Sandpaper rated around 600-grit can be used for rough work, while 800-grit or 1000-grit can be used easily for finishing.
Musical Instrument Guide : Bassoon Contents
Structure
- What Kind of Musical Instrument is a Bassoon?
- A Long Tube that can be Separated
- The Bocal and its Various Functions
- Unique Features of the bassoon, and How to Play
- [Experiment1]Comparing the Sound of Tone Holes cut Obliquely and Perpendicular
- [Experiment2]Encasing the Bore in Various Materials
- Bonus Experiment
How to Play
How the Instrument is Made
Choosing an Instrument
Trivia
- An Instrument that is Sensitive to Humidity
- Sounds from water in the U-tube?
- There's a needle in the bocal?!
- Comments by conductors caused popularity to tumble?
- Bassoon classics - Chamber music works
- Bassoon classics - Concertos
- Is the "contra-fagotto" a contrabassoon?
- What is the best tool to file a reed?